Of the 117 designated national monuments in the United States, 14 of them are in New Mexico, second only to Arizona. When I moved here in June, I dreamt of Arches National Park and the Grand Canyon and the mountains of Colorado. But I am learning what wonders my own state contains. All are 5 hours or less from Albuquerque, and 8 of them are among the 20 least visited national monuments in the country.
The national monuments here vary wildly. There’s anthropology at the Gila Cliff Dwellings in the mountainous southwest (discovered by a man shirking jury duty). There’s a 17th century Spanish Mission at Salinas Pueblo Missions in the eastern grasslands. There are miles of white gypsum dunes at White Sands, which also doubles as a bombing range. There’s Petroglyph National Monument on the west of Albuquerque, with canyons full of ancient drawings.
The western landscape expands your vocabulary. You can see a slot canyon and hoodoos, or oddly-shaped rock columns 75 feet in height, at Kasha-Katuwe Tent Rocks. In addition to the lava fields and caves of El Malpais, you can check out the tinajas, dents that hold water after rain and bloom sporadically with life, in the sandstone bluffs. Anywhere you find sandstone you might find tafoni, or small and intricate erosion patterns.
So I’m slowing traveling to the national monuments of New Mexico, camera in hand. I’ve visited Petroglyphs, Kasha-Katuwe Tent Rocks, and El Malpais.
Kasha-Katuwe Tent Rocks
Tent Rocks is named for its rocks that resemble tents, which tower 75 feet. The excellent “slot canyon trail” takes you through a slot canyon, by the hoodoos, and to a viewpoint overlooking the hoodoos; the viewpoint also provides panoramas of New Mexico scrub and the Valles Caldera. The other trail, the Cave Loop Trail, is an easy enough walk but not very interesting. Tent Rocks is a fairly small and recently established national monument. It’s easy to reach from Albuquerque and Santa Fe, with good quality roads.
If you visit Tent Rocks in the summer, get there early. We went in July and arrived at 9 AM and it was hot at the end. Other than the summer heat and rain, Tent Rocks is a great year-round destination. It is fairly popular and gets bus tours on summer weekends.
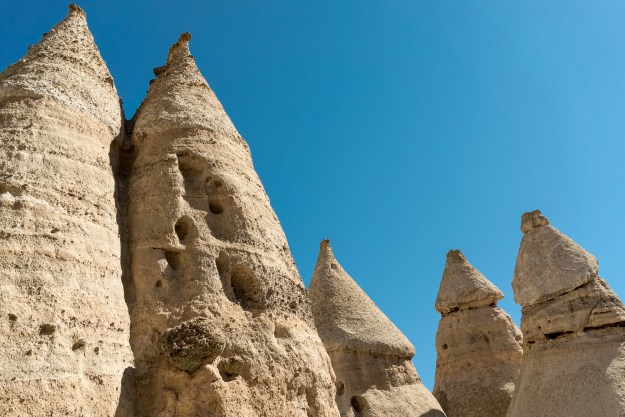
Sandstone hoodoos in Kasha-Katuwe Tent Rocks National Monument.
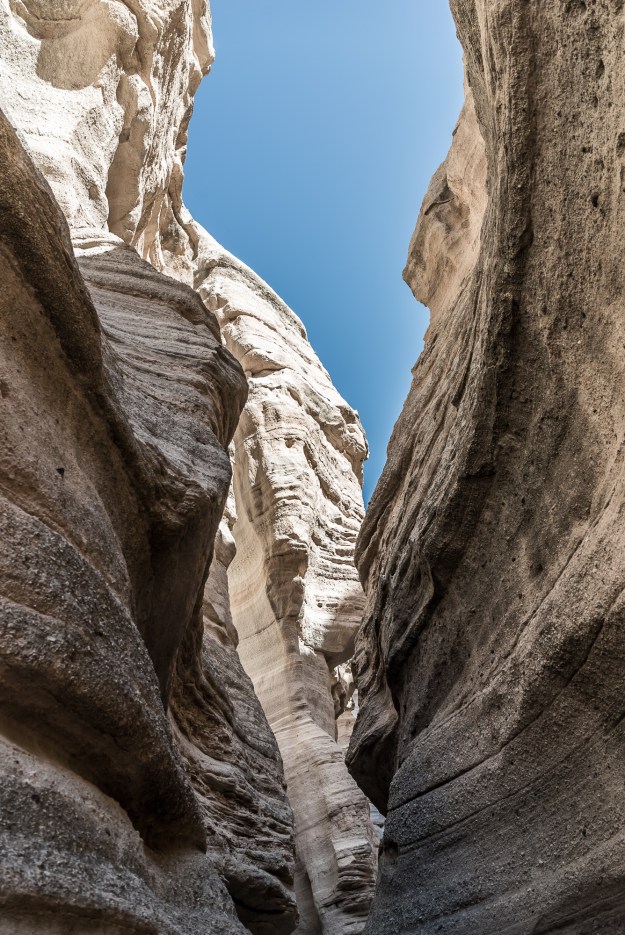
Slot canyon.
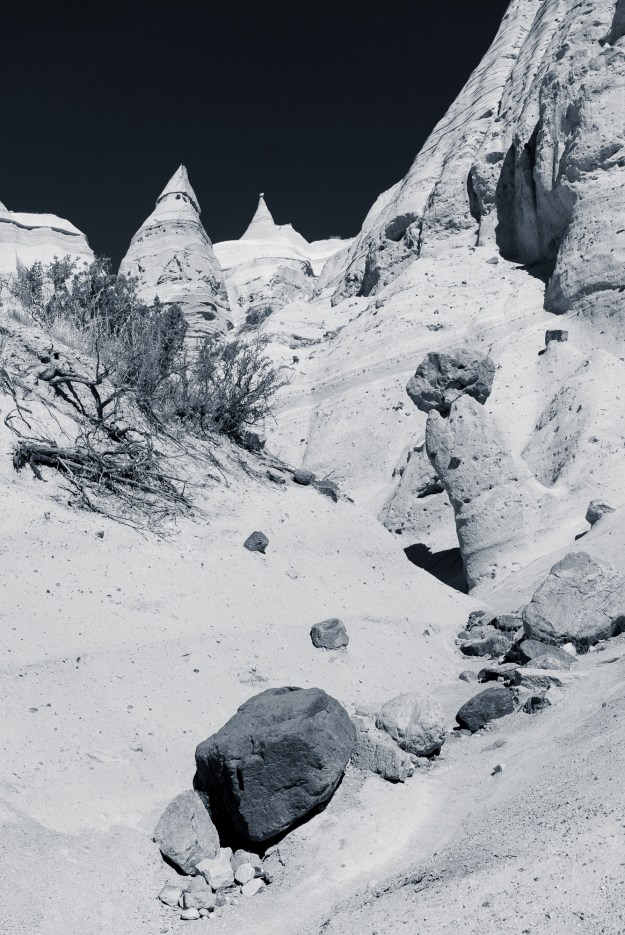
Kasha-Katuwe Tent Rocks National Monument in New Mexico, near Albuquerque and Santa Fe.
El Malpais National Monument
El Malpais translates to “the bad country.” The park has two branches which follow lava fields, which you can see easily on the satellite image of the park. Highway 117 traces the eastern edge and features sandstone bluffs, the second-largest natural arch in New Mexico, and lava fields. Highway 53 traces the west and features volcanic caves and ice caves, although many of the best features are reached only by dirt road. This weekend, I visited the sights along highway 117.
The Sandstone Bluffs Overlook area is great. The light and bright sandstone really stands out against the black fields of lava below. To the north, you can see Mt. Taylor, an inactive volcano. Dents in the sandstone, tinajas, are common on the bluff tops. Though it hadn’t rained much before we went, some still contained water and one had ice at midday.
La Ventana arch, just off the road, is the next stop south. This time of year, the north-facing arch seemed to be in shadow all day. I plan to visit again in April or May, when the light might be better but before the crushing summer heat.
The last stop south is the Lava Falls Area, which features a 1 mile hike through Pahoehoe lava. This is smoother and easier underfoot than most of the lava in the park. The Lava Falls Area is only 3000 years old, extremely young in geological terms, and some of the youngest lava in the lower 48.
In mid November, crowds were no issue. We went on a nice November day and were quite comfortable, even with the altitude. In the Lava Falls Area, it was bordering on warm, with all that black stone everywhere. I suspect much of El Malpais would be unbearably hot in the summer. The dirt roads in the western part of the park are impassable with snow, so the best seasons for El Malpais are fall and late spring.

A tinaja in the sandstone bluffs, looking north to Mount Taylor. Below to the left are the lava fields.

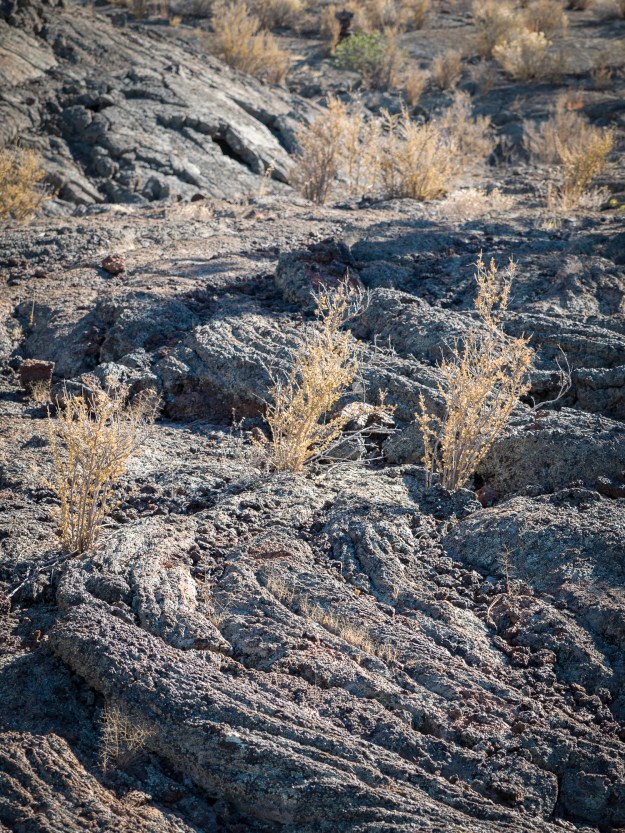
Lava Falls Area at El Malpais National Monument in western New Mexico. The lava here has several textures, but my favorite is this ropy, viscous one.
Petroglyph National Monument
Petroglyph National Monument is on the west side of Albuquerque. I realize only now that I didn’t bring my DSLR camera on this trip, but the picture below shows even a cell phone can capture the petroglyphs well. There are three sites in Petroglyph, all easy to reach. The most popular site, Boca Negra, requires some uphill hiking. The two canyons supposedly require less. Like El Malpais, the rock is black and volcanic (though older), and it gets hot in the summer.
In Petroglyphs, you can visit the Three Sisters volcanoes on the western mesa. These three cinder cones are remarkably small, but due to their position atop the mesa are visible from the whole city. Hiking the Three Sisters is still on my to-do list, but I suspect the views back toward the city and the Sandia Mountains are pretty great.

Petroglyph at Boca Negra site